Introduction
In this post, I’ll talk about the NCDCC uniform, where things go, and references to other posts giving tips on making your uniform look good.
Types of uniform
There are 3 main types of uniform that you’ll wear in NCDCC. I’ll outline each of them briefly.
- Smart 4. This is your full uniform, and the important thing about this is that the long sleeves are folded up.
- Long 4. This is rarely worn, and the difference between this and the Smart 4 is that the sleeves are not rolled up.
- Half-U (Half uniform). You may wear this more often for normal trainings. The attire is your NCDCC t-shirt paired with your pants and boots.
You may have other attires that you wear for training. FOr example, my unit often asks cadets to report in their blue NCDCC t-shirt and school pants/shorts.
Uniform components
There are many parts to your uniform. I’ll go over each of them briefly. Do see the #uniform tag for in-depth tips and tricks for each part of the uniform. I’ll go from the top to the bottom (literally, starting with your head and ending with your feet).
Beret
The beret is the piece of uniform worn on your head, with the NCDCC crest on it. Here’s a picture of your beret while worn:

Your beret should be worn with its crest over your left eye, with the beret sloping to the right. There should also be one finger spacing between your eyebrow and the bottom of your beret.
Additionally, the beret’s tag and string should be tucked in.
Furthermore, your beret should be parallel to the ground, not sloping backwards.
Field jacket
This is where you pin your badge, attach your nametag, put on your shoulder epaulettes, place your permission patch, display your Specialisation Course patch and hang your UDI red-and-white striped band (if applicable). If you want to see how to pin you badges, look at this article.
Your field jacket should be tucked into your pants, with your collars starched. This is important: your collars need to be starched until it can stand up by itself. How do you do this? Spray the starch on the underside of the collar, then iron the opposite side. NEVER IRON THE SIDE YOU STARCHED! This creates starch damage (white powder) on your collar. Use some water and dab at it if you see it to make it dissolve.
Belt
Your belt should not be upside-down. It may sound ridiculous, but it can happen. Also note that your belt should not be too loose and not fall around.
Additionally, your belt clips should be moved as forward as possible, and not placed around your belt.
Field pants
Your field pants have one too many pockets. Really. There’s 2 on the back and 4 on the front. In the lower right/left pocket, you should keep your beret there. I usually open the left-most velcro only and slot in my beret. The other velcro remains sealed. If you take your beret out for whatever reason, remmeber to seal the beret pocket. I’ve nearly gone out in parades with the unsightly beter pocket half-velcroed.
Pants line
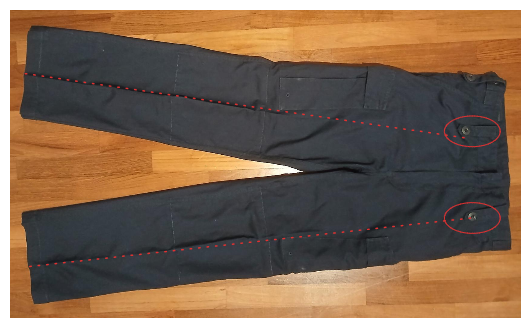
Your field pants needs a pants line down the middle. How do you do this? Well, you would need to fold your pants along an imaginary line down from the first belt loop on either side of the center button. Then, spray starch down each side, flip the pants over, and iron the opposite side of the starch. Repeat 1 more time and leave it to dry.
Here’s the lines your should fold your pants along:
Black socks
Yes, the black socks may be as tall as your knees when put on, but it’s good, since it has to be taller than your boots so that you can put your garters (more of that in a moment) on your socks.
Garters
Your garters (you’ve probably never heard of them before!) are like elastic bands that prevent your pants from falling everywhere. You put it above your boot height, and then wrap your field pants under and around it, so it has elasticity at the bottom, which keeps the bottom of the pants in place.

(Taken from https://g-military.com/products/garters-2pcs-pairs)
Boots
Ah, the hardest part of the uniform to perfect. There’s not much to the boots themselves, except that you’ll need to learn how to tie a caterpillar knot, and how to polish your boots. Polishing them is the toughest part of the boots. You need to have a shine on them. For reference, look at the boots of your unit’s Warrant Officer(s) (assuming they have a really kilat uniform).
Conclusion
I’ll go more in-depth into perfecting the different components of your uniform in later articles. For now, just familarise yourself with the parts of your uniform.